Local Development Setup
This post describes the steps and software requirements one needs to follow, to create and set up a working, local AEM instance. Secondly, an example of using the "Maven Archetype" provides the necessary basics to bootstrap a new AEM project, according to the best practices.
TL:DR
- Install Java
- Download JDK
- Add to $PATH
- Login with Adobe Account & Download AEM
- Adobe Software Distribution
- e.g AEM SDK v2021.3.5087.20210322T071003Z-210325
- Note, AEM Changed its Versioning for Cloud to
year + version + timestamp.
- Note, AEM Changed its Versioning for Cloud to
- extract archive
- rename to
cq-author-p4502.jar- If you want to start a local publisher, name it to
cq-publish-p4503. - You can change the number to any valid port if you have something already running and blocking that specific port.
- If you want to start a local publisher, name it to
- Start AEM Instance
java -jar cq-author-p4502.jar- wait 1-5 minutes (Newer Versions of AEM start a lot quicker, than e.g 6.3 or 6.4)
- Install Maven
- Download
- Add to $PATH
- Execute Maven Archetype Command
cd ./mysitemvn clean install -PautoInstallPackage
- Access http://localhost:4502 and login via admin:admin
Once you have shutdown (ctrl+c) your initial AEM Instance, you can / should start and shutdown AEM via the provided
scripts in crx-quickstart/bin.
Requirements
The following section describes the software needed to run a local AEM instance, as well as being able to start extending and customizing AEM.
AEM
This setup works for all the latest major AEM Versions, including AEM as a Cloud Service, which is Adobes latest AEM
offering. The Cloud SDK and 6.5 are in active development and receive new features on a regular basis. The Cloud SDK is
being versioned via timestamps, such as aem-sdk-2021.3.5026.20210309T210727Z-210225, while the AEM On-Premise and
Managed Services offerings still bear the classic major.minor.patch level notation.
Tools
- Java JDK
- JDK v11 -> AEM Cloud SDK + AEM ≥6.5
- JDK v8 -> AEM ≤6.4
- Maven ≥3.39
- AEM-Repo Tool
- Optional -> Conveniently push/pull content to the local JCR (AEMs Database)
- NodeJS + NPM
- Optional -> Required, if one wants to use the SPA Framework (React / Angular Components)
Setup
A local development setup consists of two parts. One, the actual AEM instance (java process) running and, secondly, the repository containing all the projects custom code.
Running AEM locally
After downloading the desired AEM Version from the Adobe Software Distribution extract the archive — if the cloud sdk has been downloaded. Otherwise, we can directly run the jar.
By renaming the jar according to the following schema, a couple of default settings can be
set: cq-(author|publish)-p(port).
For example cq-author-p4502.
When started, this will run the AEM instance as an
author and expose it locally via port 4502.
Running the jar is as easy as executing it like this: java -jar my-downloaded-aem.jar -gui.
The parameter -gui can be appended, to launch an additional small UI, which informs the user about the startup /
installation progress.
Additionally, -gui will automatically set the default admin users credentials to admin:admin.
Configuring Debug Ports for Local Development
Do be able to attach a java debugger locally, the startup scripts need to be extended by a couple of arguments.
In each (author, publish) start script, find the following line
if not defined CQ_JVM_OPTS set CQ_JVM_OPTS=-Xmx4024m -XX:MaxPermSize=256M and add the following arguments
if not defined CQ_JVM_OPTS set CQ_JVM_OPTS=-Xmx4024m -XX:MaxPermSize=256M -Djava.awt.headless=true -Xdebug -Xrunjdwp:transport=dt_socket,server=y,address=30303,suspend=n
.
Note, that the address=30303 needs to be different for author and publish.
A debug run config in Intellij IDEA looks like this

You can download example files here:
Bootstrapping a development environment via Maven Archetype
The Apache Maven Archetype describes Archetypes like this
[...] provide a system that provides a consistent means of generating Maven projects. Archetype will help authors create Maven project templates for users, and provide users with the means to generate parameterized versions of those project templates.
To summarize, by using an archetype, which itself has been created by the AEM Developer Team, we can set specific variables with which the archetype bootstraps itself and creates a customized set of files and directories — ready to use.
The following example demonstrates a bash command using the v27 of the aem-project-archetype. By setting 'appTitle', ' appId' and 'groupId' we tell the Archetype how it should name and structure our packages. 'frontendModule' can be one of the following items['none', 'general', 'react', 'angular']. By specifying this parameter, we can opt in to use the (new) ui.frontend module, which itself can be preconfigured with either a "classic" html variant, or one of the modern Javascript SPA Frameworks - currently only React and Angular are supported.
If we do not specify an 'aemVersion' the latest AEM Cloud Sdk will be used. A specific version can be set via passing the AEM version in its major.minor.patch level notation. For example 'aemVersion="6.4.8' would create the archetype based on AEM 6.4 with Patch Level 8 and add all necessary dependencies to the pom.xml.
mvn -B archetype:generate \
 -D archetypeGroupId=com.adobe.aem \
 -D archetypeArtifactId=aem-project-archetype \
 -D archetypeVersion=27 \
 -D appTitle="My Site" \
 -D appId="mysite" \
 -D groupId="com.mysite" \
 -D frontendModule=react \
 -D includeExamples=y
The Archetype provides a wide range of optional properties, with sensible defaults set for each. For a list of all available settings, please check the official documentation on GitHub.
Executing the above command will create the following folder structure
Using AEM as a Cloud Service SDK version: 2021.3.5087.20210322T071003Z-210325
Creating content skeleton...
[INFO] Project created from Archetype in dir: /Users/nerlich/Downloads/temp/mysite
[INFO] ------------------------------------------------------------------------
[INFO] BUILD SUCCESS
[INFO] ------------------------------------------------------------------------
[INFO] Total time:  10.865 s
[INFO] Finished at: 2021-03-27T20:54:40+01:00
[INFO] ------------------------------------------------------------------------
cd mysite
-rw-r--r--   1 nerlich  staff  1.2K .gitignore
-rw-r--r--   1 nerlich  staff   11K LICENSE
-rw-r--r--   1 nerlich  staff  5.2K README.md
drwxr-xr-x   4 nerlich  staff  128B all/
drwxr-xr-x   3 nerlich  staff   96B analyse/
-rw-r--r--   1 nerlich  staff  494B archetype.properties
drwxr-xr-x   4 nerlich  staff  128B core/
drwxr-xr-x   6 nerlich  staff  192B dispatcher/
drwxr-xr-x   4 nerlich  staff  128B it.tests/
-rw-r--r--   1 nerlich  staff   28K pom.xml
drwxr-xr-x   5 nerlich  staff  160B ui.apps/
drwxr-xr-x   4 nerlich  staff  128B ui.apps.structure/
drwxr-xr-x   4 nerlich  staff  128B ui.config/
drwxr-xr-x   4 nerlich  staff  128B ui.content/
drwxr-xr-x  12 nerlich  staff  384B ui.frontend/
drwxr-xr-x  11 nerlich  staff  352B ui.tests/
Building and deploying the complete development environment can be done via the following
command mvn clean install -PautoInstallSinglePackage - executed in the root directory.
ui.apps, ui.config and ui.content can be individually build with the profile -PautoInstallPackage. Deploying
just the
java module 'core' can be achieved with the profile -PautoInstallBundle.
I usually just run
mvn clean install -PautoInstallPackagein my projects' root. The deployment is quick enough, and I can be sure that I did not forget anything.
SonarQube Setup - Automatic Rule Evaluation
- Use official SonarQube DockerCompose
yml DockerCompose Sonar + Postgres
- save locally
- update Postgres version to
v14 - on M1 (Apple Silicon) Mac add the following line
platform: linux/amd64tosonarqube:SONAR_SEARCH_JAVAADDITIONALOPTS: "-Dbootstrap.system_call_filter=false"toenvironment:- In your docker settings increase the available disc size to at least 100GB
- (On Windows) Increase available ram via powershell
- cd to
C:\Users\<username> - Create a new file
.wslconfig - Add the following two lines
-
- run
wsl --shutdown - reboot your machine
- https://stackoverflow.com/a/69294687/4034811
- cd to
- Navigate to the above yml file in your local file system
docker-compose up(Add-dto run this in the background)
- Navigate to
http://localhost:9000 - Login with the default SonarQube Credentials
admin/admin- Update the password when prompted by the app
- Go to
http://localhost:9000/admin/marketplaceand install the following Plugins- AEM Rules for SonarQube by "Wunderman Thompson Technology"
- IBM iX AEM Sonar rules by "IBM iX"
- For third-party plugins, place the .jar in your volume target of
sonarqube/extensions/plugins- Default on Mac Docker Hub is
/opt/sonarqube/extensions/plugins - On Windows, browse to
\\wsl$\docker-desktop-data\data\docker\volumesvia explorer- one folder for each volume exists
- Default on Mac Docker Hub is
- restart SonarQube
- Go to 'Projects' -> Manually -> Analyse locally
- Choose a token name
- Generate a token
- Save this token securely
- Update your local maven settings according to the documentation http://localhost:9000/documentation/analysis/scan/sonarscanner-for-maven
- Analyse your local project
- Navigate to your projects root pom.xml file
- Execute the sonar
command
mvn clean verify sonar:sonar -Dsonar.projectKey=<your-project-name> -Dsonar.host.url=http://localhost:9000 -Dsonar.login=<your-token> - Replace
<your-project-name>and<your-token>with your own values generated in step 7.
Add JaCoCo Unit Test Coverage
- Navigate to your projects root
/pom.xmlfile - Add the following line to the
<properties>section<sonar.coverage.jacoco.xmlReportPaths>${project.basedir}/target/site/jacoco/jacoco.xml</sonar.coverage.jacoco.xmlReportPaths><sonar.coverage.exclusions>ui.apps/**/*,ui.tests/**/*,it.tests/**/*</sonar.coverage.exclusions>- to exclude specific paths from the (coverage) analysis
- Add the Jacoco Plugin
<plugin>
     <groupId>org.jacoco</groupId>
     <artifactId>jacoco-maven-plugin</artifactId>
     <version>0.8.8</version>
     <executions>
         <execution>
         <id>prepare-and-report</id>
         <goals>
         <goal>prepare-agent</goal>
         <goal>report</goal>
         </goals>
         </execution>
         <execution>
         <id>report-aggregate</id>
         <phase>verify</phase>
         <goals>
         <goal>report-aggregate</goal>
         </goals>
         <configuration>
             <outputDirectory>${project.basedir}/../target/site/jacoco-aggregate</outputDirectory>
             <excludes>
                 <exclude>ui.apps/**/*</exclude>
                 <exclude>ui.tests/**/*</exclude>
                 <exclude>it.tests/**/*</exclude>
             </excludes>
         </configuration>
         </execution>
     </executions>
</plugin> - Add the Sonar Maven Plugin
<plugin>
 <groupId>org.sonarsource.scanner.maven</groupId>
 <artifactId>sonar-maven-plugin</artifactId>
 <version>3.8.0.2131</version>
 <executions>
     <execution>
         <phase>verify</phase>
         <goals>
             <goal>sonar</goal>
         </goals>
     </execution>
 </executions>
</plugin> - If a module complains during a regular build due to missing credentials, add the following snippet to its pom. file
e.g.
/ui.tests/pom.xml<plugin>
<groupId>org.sonarsource.scanner.maven</groupId>
<artifactId>sonar-maven-plugin</artifactId>
<executions>
<execution>
<phase>none</phase>
</execution>
</executions>
</plugin>
Connect Intellij IDEA SonarLint Plugin
- Install the SonarLint Plugin from the IDEA Marketplace
- Go to Settings -> Tools -> SonarLint
- Click on the "+" icon and add your local SonarQube Instance (e.g. http://localhost:9000)
- Go to
http://localhost:9000/account/security- Generate a "user token"
- Save this securely
- In your IDEs Sonar Lint Settings add the token from step 4
- Click apply and "Update binding" afterwards
Set up a local Dispatcher with Docker
Just follow the steps described here: local-development-environment-set-up/dispatcher-tools.
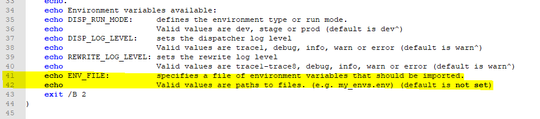
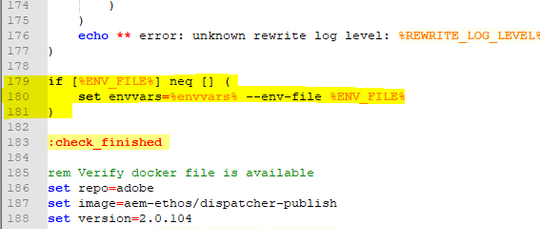
On Windows, the docker_run.cmd file will need to be slightly modified. Remove the following lines:
- Line: 41 + 41
- Line 179 - 181
Thanks for reading!
luca
Links & Downloads
- AEM Software Distribution
- The official Adobe Experience Cloud Download Hub
- Official AEM Archetype GitHub Page
- AEM Core Components
- AEM ACS Commons